Tuesday, June 16, 2015

June Bee Sewcial block


I made these two blocks for Debbie for June's Bee Sewcial bee blocks. She requested mid-century modern and provided some great ideas on her Pinterest board. I know I had a bit of Alexander Calder on my mind when I made these, even though I think that is sort of a subtle influence. I chose to keep the color palette restrained for each block, but with some carryover of color from one to the other. I think they'll play nicely with some of the other blocks I've seen too.

Speaking of the other blocks, I am amazed by what my bee mates come up with every month. You can see all their brilliant work on the Flickr group. I'm lucky to be a part of this!

Sunday, May 31, 2015

May Bee Sewcial block

I really enjoyed seeing this on my design wall!

May was Marci's month for Bee Sewcial and I really enjoyed her assignment. It involved listening to music for inspiration which was a first for me. I thought the tune kind of bopped along so I wanted my block to mimic that feeling. She also had a lot of Sherri Lynn Wood's work on her inspiration board and wanted it to feel--even if abstractly--like scenery and houses. It also needed to be improv. (Plus there was more but this is the summary of what she was asking for.) This is what I came up with. I see houses, meadows, mountains and sky but it is up to your imagination to make them out.

Friday, May 29, 2015

Fun HST quilt for a recent grad


I made this quilt as a gift to the daughter of some of our closest friends. She just graduated high school so I sized this to fit on a twin xl dorm bed, if she likes it enough to want it for her bed.


I took a layer cake I was given at Christmas (thanks Mom and Dad!) plus some extras from my stash and made a bunch of HST. I added a few random solids instead of the green for a few of them to liven it up. I'm glad I went with that itty bitty printed green instead of a solid because it adds a nice texture.


It was quilted in a baptist fan design by Susan Santistevan. She did a great job and it works well with the kind of funky vintage mod vibe of the fabrics.

Stats:
Fabric: most of a layer cake of Felicity by Robert Kaufman, random stuff from my stash and the green is Patrick Lose Mixmasters Dot-to-Dot.

Quilted by: Susan Santistevan

Size: 63'' x 90''

Thursday, May 7, 2015

Pinwheel Pincushion Giveaway!


It is Giveaway Day at Sew Mama Sew! 


I want to giveaway the adorable Pinwheel Pincushion I just made! 


It is so cute and hopefully someone out there will enjoy having something handmade and colorful to brighten up their sewing space. I might sneak a few extra goodies into the mix too, but those will be just a little surprise.

Enter by commenting on THIS post. I want to know what your favorite fabric is! The giveaway is open until Sunday, May 10 at 5pm PST. I'll draw using a random number generator.

If you don't win, I just posted a tutorial so you can make your own. If I could make one for everyone I would, but this is the next best thing.

Update: Giveaway winner is #39! Giveaway is now closed!

Pinwheel Pincushion Tutorial & Beginning Paper Foundation Piecing


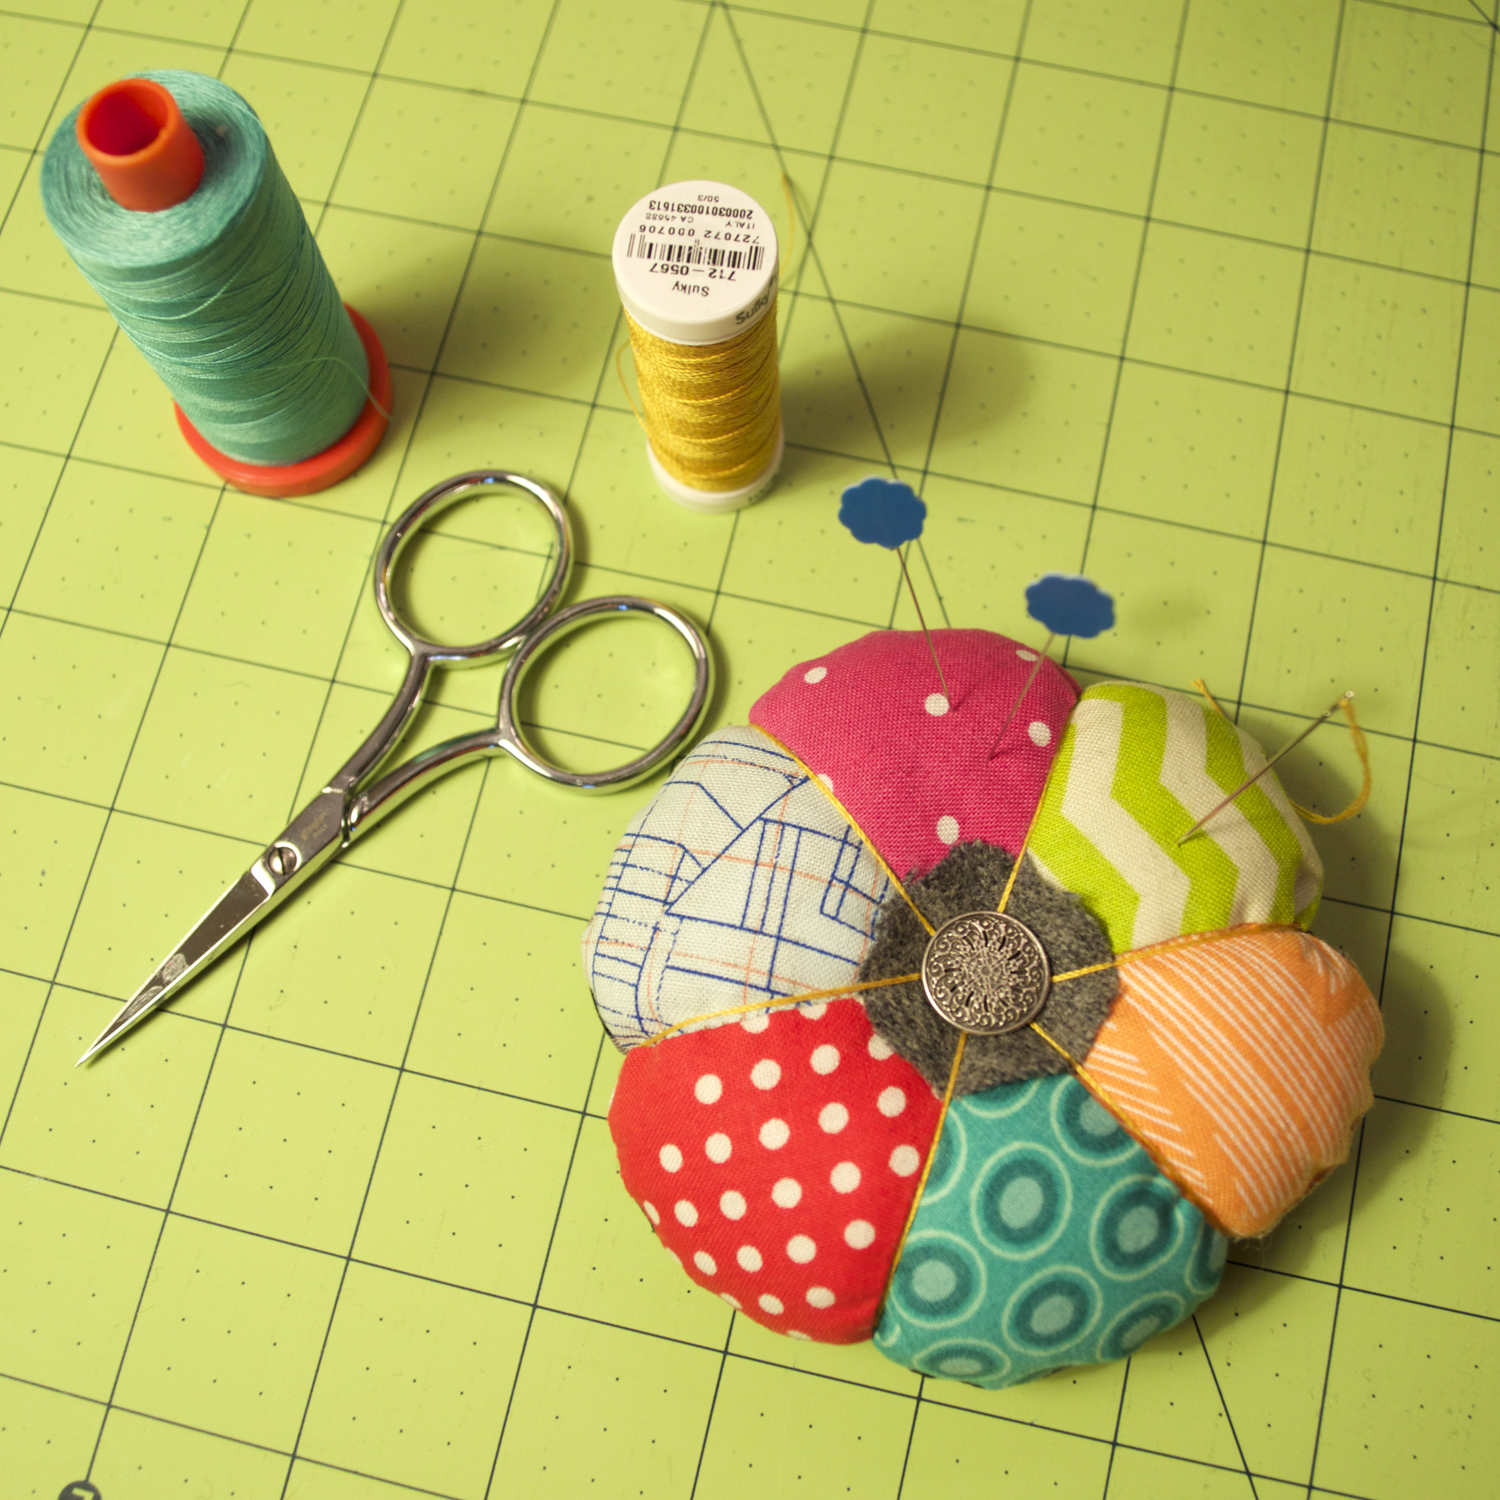
I just made this cute pincushion and thought I would share how I made it. Paper piecing can seem a bit intimidating if you've never tried it but this one is an easy one to do. I've explained it step by step for beginners.

Materials:


  • Printout of Pinwheel Pincushion foundations templates
  • 6 scraps of fabric for the petals, each approximately 3'' x 5''
  • 5'' square of fabric for backing
  • 1'' or so scrap of wool felt, cut into a circle
  • 1 shanked button
  • Thick thread for gathering: 12 wt or perle cotton thread, or double strand of floss
  • Long needle
  • fiberfill
  • crushed walnuts (optional)

Instructions:

1. Roughly cut out the foundation templates, 1/8'' or more from the outside black line.

2. Place two petal fabrics on the non-printed side of Template 1, right sides together, so that both will cover their entire wedges and past the seam allowance when sewn and pressed open. In my example, the printed side of the template is up, then the wrong side of the orange fabric, and then the right side of the green fabric. The orange fabric will be my center wedge and my green fabric will be my left wedge. The fabrics need to overlap at least 1/4'' past the sewing line for their seam allowance. In my example, this is the seam sewing line on the right side of the center wedge. It doesn't matter which wedges you start with. (Note: the foundation is a mirror image of the finished wedge placement.) I'm kinda lazy efficient and don't pin these but if it make you feel more comfortable, you can pin the pieces to the foundation to keep them in place while you sew.

3. Shorten stitch length to 1.5mm. Sew on the foundation line, going a stitch or two beyond the outer line/seam allowance.

4. Check that your wedges cover the entire wedge plus seam allowance. If ok, fold back paper on seam.

5. Line up ruler along paper fold at the 1/4'' mark. Trim excess fabric leaving a 1/4'' seam allowance. (Don't cut on the stitch line or paper!)

6. Flatten out foundation paper and press wedges open.
This is what the right side will look like at this point.
This is what the back/foundation side will look like at this point.
7. Repeat steps 2–6 to add third wedge. Once wedges are pressed, stitch 3-4 stay stitches in the seam allowance to tack down the outer corners of the wedge.

8. Repeat steps 2–7 for Template 2 to create other half of the pincushion top. Trim both halves on outside line. Do not remove papers yet!

9. Put both template halves right sides together. Poke a pin through the center tip of each half to line them up. Sew them together along the straight center line.

10. Remove the foundation papers. (Here is where the reason you reduced stitch length becomes apparent: it is much easier to tear the papers out!) Press.

The finished pincushion top
11. Here's my cheater shortcut. Instead of cutting out a template for the bottom circle, place the bottom square and pincushion top right sides together with the top on top.

12. Starting a couple stitches before one of the wedge seams, stitch all around the top with a 1/4'' seam allowance, leaving a gap by stopping your stitching a couple stitches past the opposite seam on the wedge you started with. Backstitch at the start and end. (Stitching just over those seam lines will reinforce the pieced top.) Trim excess bottom fabric.

13. Turn right sides out and fill about half with crushed walnuts and half with fiber fill. You can certainly skip the crushed walnuts but it gives the pincushion some nice weight. Stitch the opening closed by hand. 

14. Thread a needle (I used a doubled-up strand of 12 wt thread) with about a 30''+ tail. Make a knot at the end. Poke the needle through the top of the pincushion where the pinwheel wedges meet in the center. (The button and felt circle will cover the knot.)

15. Bring the needle all the way from the top to the center of the bottom and pull thread tight.

16. Bring thread back up around to the top. Thread the needle through the button and the center of the felt circle. Sew through the center of the top to the center of the back, lining up the thread with a wedge seam.

17. Sew through the pincushion for each wedge seam in this order: bring the thread around from the bottom along one of the wedge seams, sew through the button, sew through the center of the felt circle, sew through the center of the top to the center of the bottom and bringing it up around again on the opposite side. Keep thread taut to gather up the pincushion. Continue stitching until all of the wedge seams have been gathered. 

18. When all the wedges are gathered, sew the last wedge through to the back as in step 17, but instead of bringing it back around along a wedge seam, move it a couple threads over and bring it back up through the center of the back to the center of the front. Knot off under the button on the top. Now you are done!


Tuesday, May 5, 2015

Cute and Scrappy Doll Quilt


My daughter has a birthday party to go to in a week. Her friend wanted some super expensive accessories for her American Girl doll. Instead, I made this little doll quilt that is perfectly sized for an 18'' doll. It's nothing but a 5 x 6 layout of 4'' squares, backed with a fat quarter, quilted with a swirly flower, raw edge appliquéd and bound with some crazy homemade bias binding from my great aunt. The birthday girl really likes purple, and also yellow and green. I raided my scrap bin and everything is from there or my stash.


Speaking of the bias binding, I'm really glad I used that for something like this because now I know how wonky she made it and won't likely use it again. I have a large amount of her handmade bias binding. Three sides look just fine but the bottom got weird. Lesson learned and now my daughter gets to use it for her art collages. I think I'll leave it even though part of me really wants to do it over. I stitched it down with 3 rows of stitching. And it's a doll quilt meant to be played with. The stitching on it looks cute.


I hope her friend will enjoy getting this as a birthday present! It is one of a kind, made just for her.

Thursday, April 23, 2015

April Bee Sewcial blocks

These two are both for Di. I had a lot of fun with these blocks, and a bit of struggle in a good way. I'm getting more and more comfortable with improv. For me, it is something that I feel is improving with practice. I think a lot of that has to do with building up more confidence and learning to let go a bit more.

Busy, bubbly block with lots of texture. The bubbles were inset using the 6 min circle method.

I love how the blue curve on the right happened
to nearly line up with the form to the left.

Thursday, April 9, 2015

March Bee Sewcial blocks

Melissa requested transparency blocks using cool blues and greens with a little gray, in two sizes. Here are the blocks I made for her. I really enjoyed the challenge of achieving the transparency look.


This block is the first one I made. I doodled it on my computer and then made my own paper foundations to create it. It finishes to 14'' square. It would make a great pillow so I'm thinking of making another one.


This one is the second block that I'm giving her. It finishes to 9'' square. I made my own little quarter circle templates. Each quarter circle is 2 1/4'' finished. That led to some cursing but eventually I got a technique that worked. The key was glue basting the entire curve together before sewing, stitching with a small stitch length and slow sewing. The result was totally worth it, in my opinion!


This last one is staying with me. I again made my own paper foundation for it. I love the way it turned out but I trimmed it too short! I'll find a purpose for it someday!

Tuesday, April 7, 2015

Awesome poster blocks!


I love these poster blocks from my Bee Sewcial bee mates. Thank you Stephanie, Hillary, Debbie, Marci, Leanne, Diane, Melissa and Felicity!!!!!!!! All of the angles and bold shapes are different but complement each other. Each composition functions on its own.

I am mulling over exactly what I want to do to put them into a quilt and I'm just waiting on one more block. I also need to actually make mine.

I just couldn't be more impressed with the talent of everyone who made a block for me! More of our collective work can be seen on Flickr here.

Monday, March 2, 2015

QuiltCon 2015: Gee's Bend quilters

Quilters from Gee's Bend at the keynote

It was really special that four quilters from Gee's Bend came to QuiltCon. I attended the keynote which was positively electric. The speakers were Mary Ann Pettway, China Pettway, Gloria Hoppins and Lucy Witherspoon. The mood was uplifting and encouraging and I could feel the room come together on a deep level during their address. They sang spirituals to us to start things off and throughout the address. Their singing and words touched my heart and made me feel accepted and that we should all accept each other as who we are. I have never had someone sing spirituals to us and I'm not a very religious person, but it was moving. It was interesting to hear a little bit about how they grew up and started quilting, and a glimpse into what their life is now like. I need to read more about them.

I love this quilt top and plan to hand quilt it.
Thank you Gloria, China, Lucy and Mary Ann!

The workshop I took with them may have been light on instruction but was deep with encouragement and support. They also started and ended it with singing to us. I cannot adequately put it into words how special that was. It gave me goosebumps. During class, any one of the ladies was more than happy to answer any questions. Just being around Mary Ann, China, Gloria and Lucy was fun. Mary Ann certainly has a great sense of humor. I feel like their approach freed me up in my improv and gave me a sense of confidence because they were so accepting. I tried to work in their style but felt free to do what I wanted my way. There were definitely no rules to follow. I loved every minute of it. I feel blessed to have been able to have that experience.

Thanks to Jennifer Sampou, (yes, the fabric designer!) who gave me some of her new woven fabric pieces that were absolutely meant to be in that quilt. She was in my workshop, along with Monica Solario-Snow and many other quilters whose names you may not know but are equally talented. In particular, I really enjoyed the company of Tricia Royal in both my classes. She was a QuiltCon winner, taking a third place ribbon in Improv. See what I mean? Talent was just everywhere! That lifted me up too!

Even my attendance at the keynote was due to a friend of a friend giving me her spot because she couldn't attend. I cannot say enough that this experience was only what it was because of the people I shared it with.

QuiltCon 2015: Icing on the Cake

The icing on the cake for QuiltCon was winning two awards for my quilts. I couldn't believe it when I got the email a couple days before QuiltCon saying to keep it quiet but that each quilt had one some award, but the email did not say what. I unfortunately could not attend the award ceremony to find out because I had already signed up for a class that started at the same time. Luckily I had friends on the ground that went to the ceremony and texted me what I got (thank you Chrystal and Stephanie!).

Color Play, Second Place in Use of Negative Space


Emergent, Third Place in Piecing


I ended up with a second place ribbon in Use of Negative Space for Color Play and a third place ribbon in Piecing for Emergent. I am still on cloud 9 to think that my quilts were winners! I was excited just to have them in the show. It is such a good feeling to be validated that my work is good and that others like it. I do feel there is a certain element of luck to be one that actually won since there was so much incredible work in the show but boy am I happy anyway!

Congrats to my friend Stephanie for third place in Use of Negative Space! It was an honor to have our quilts hanging together!

If anyone is interested in making Color Play, the instructions are in the book "Lucky Spool's Essential Guide to Modern Quilt Making."

QuiltCon 2015: A Whirlwind of Wonderful


QuiltCon was an amazing experience. The organizers did a fantastic job of putting it together. The best was meeting up with old friends and making new ones, along with being able to say hello face-to-face to so many quilting idols and unabashedly telling them that I loved their work. Really, I had no shame in going up to complete strangers, whether famous or not. Being around that many people who geek out on quilting like I do was an incredible feeling. Spending time with my friends was such a special treat. All the lunches and dinners, Moda Party, walking around the convention center, classmates, beemates I got to meet in person for the first time and people I had the pleasure to talk to otherwise just made the whole experience.

Eating lunch at Iron Works.
Nancy Zieman is in that booth behind us and Latifah Saafir took this photo
right before she sat down and ate with us!

Stephanie, Kathryn, Susan, Theresa, Christine and me

Chris, Chrystal, Maggie and Wyna looking adorable outside QuiltCon

My roommates Wyna, Maggie, Chris and Chrystal were the best ever and the experience just wouldn't have been the same without them. Plus I have to thank them for putting up with me for so many days in a row.


I spy Christine Perrigo's bias challenge quilt!

Face #1 by Melissa Averinos (Judge's Choice winner)

quilt by Sherri Lynn Wood
(anyone help me out with a name of the quilt? my photo wasn't good)


The inspiration I got from seeing the quilts in the exhibit and also all the charity quilts in the two lecture halls is something hard to put into words. I wish I had a whole extra week just to sit and look at each one in more detail. It is incredible to see what other quilters are making. I took lots of photos so I can go back and look at them, but that isn't the same as sitting right in front of them.

I also took two classes and attended some interesting lectures. My classes were Considering Curves with Sarah Nishiura and Gee's Bend workshop. They were both good classes. I knew the base techniques for the curves but Sarah had some great tips that improved my work and seeing her in class examples opened my eyes to how I could work with improv curves. I'm going to go over the Gee's Bend quilters in another post because I need to talk about that all on its own.

For lectures I attended Maker to Making a Living: Moderated by Jacqueline Sava with panelists Brenda Groelz of Handi Quilter, Denyse Schmidt, Mary Fons and Heather Givens; Masterpiece Theatre: Modernism in American Patchwork with Bill Volckening; Simple Quilts by Yoshiko Jinzenji and Take Better Quilt Photos with Meg Cox.

All in all, it was fun, enriching, inspiring and I have to admit—exhausting (but in the best possible way)!

Sarah Nishiura in front of our class blocks

Yoshiko Jinzenji's work is awe inspiring
(And I totally ate my way through Austin food so it was a delicious break from my norm, too.)